Simulation of Jasmine robot
The Jasmine III robot and other I-SWARM robots have a simulation system. This simulation is a 3D model for these robots. It is based on Breve, which is an Open-source 3D simulation environment with an OpenGL display engine. Therefore it is easy to build new simulations with this program. This program is based on a special programming language called Steve. It is an oriented-object language and it is very simple. All the simulation system has been developed with Breve 2.3 version.
The model of Jasmine III with its proximity sensors and distance sensor (Beamer sensor) are implemented. Also, the autonomous movements and motion into the arena are implemented. The simulation package contains the main functions for controlling the robots and for creating new behaviours.
If it is necessary, the user can add new functions into the simulation. These improvements have to be written in Steve Language. The documentation about Breve and Steve are in the Breve Homepage (http://www.spiderland.org/breve/).
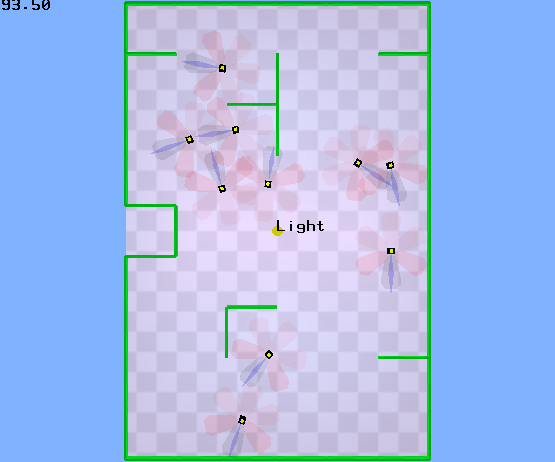
Simulation running random movement behaviour. You can see 10 robots moving inside the arena detecting the obstacles (walls and other robots).
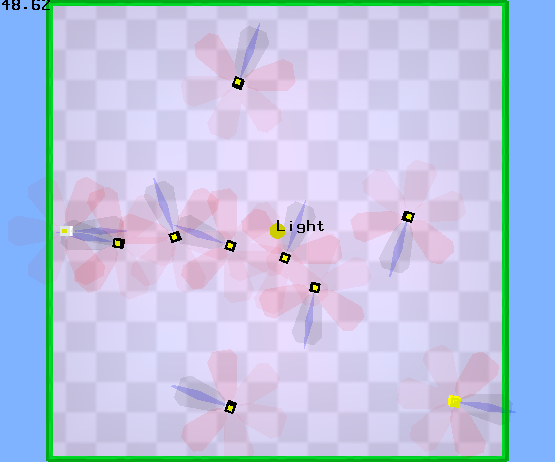
Simulation running Communication Street behaviour. You can see 6 robots which form a “street” and other 4 robots are moving inside the arena in order to add themselves to the street.
The following diagram shows the basic files structure of the simulation:
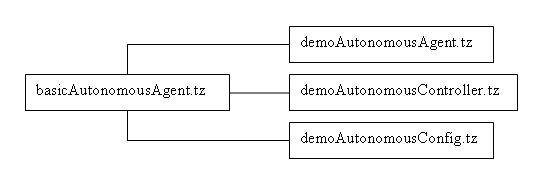
| basicAutonomousAgent.tz | all the basic functions for robots are written in this file. |
| demoAutonomousAgent.tz | with this file the user can modify or create new behaviours. |
| demoAutonomousController.tz | this is the file for playing the simulation. |
| demoAutonomousConfig.tz | with this file the user can set up the simulation. It contains the global variables used in the simulation. |
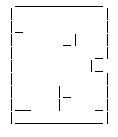
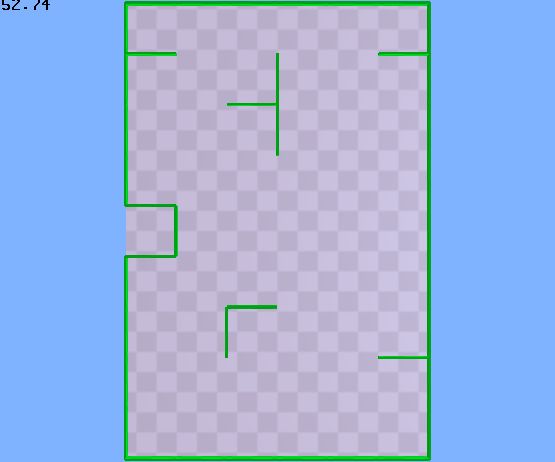
Depending on the behaviour, it is necessary to run the simulation in different Stages. With the simulation system is very easy to create a new Stage. It consists in a text file which contains the vertical and horizontal walls. In the simulation, the text file is rotate 180 degrees. It is due to the simulation system fixs the centre of the Stage in one corner.
An example of this is here:
TEXT FILE | RESULT IN SIMULATION
|
 | 
|
 | 
|
Please be careful when you create the text file. Vertical walls are written in odd columns of the text file and horizontal columns in even columns of the text file. Also be careful with the rotation of the Stage when you want to run the simulation.
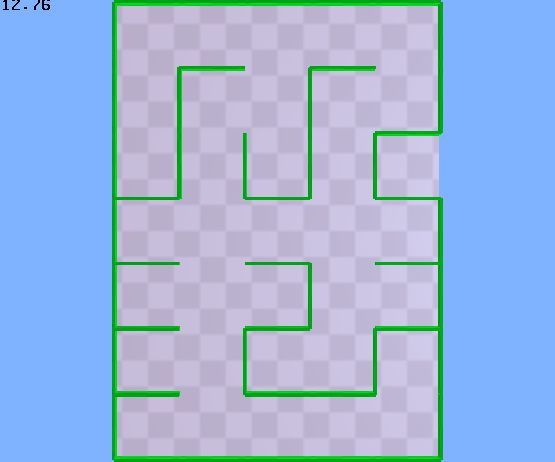
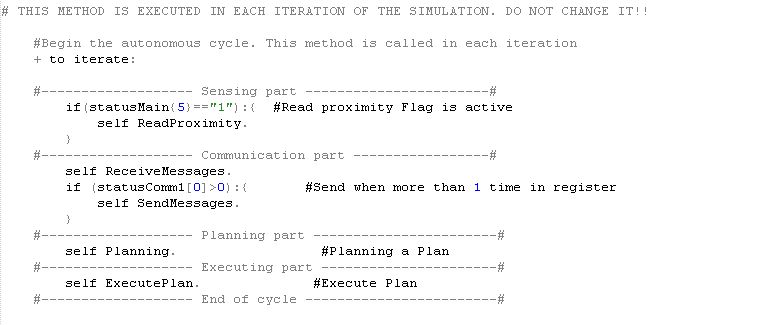
All behaviours are based on plans. Depending on the value of proximity sensors and depending on the different messages received, a robot can chose a plan and after it can execute it. These operations are computed each iteration of the main loop which is executed always continuously. The following diagram shows this loop:
This loop is executed each iteration of the simulation, so it is executed continuously.
Here is the source code of this main loop:
Using the five steps of the Jasmine SDK, you can create in an easy way a new behaviour. When you have a scenario, you have to define the roles of each robot (using behavioralRole variable). After, you need to define communication signals (using SendMessage8? method). The next step is to describe the roles in a graphical way (using state diagrams or similar). The final step is to write those roles in Steve language into demoAutonomousAgent.tz file. The best way is to add new Plans in the ExecutePlan? method and to execute one of those plans preparing a Plan in Planning method (and using statusPlan variable) depending on the sensors values (proximity sensors and received messages). Also, you can set up the initial registers values in the "start" method. This method is executed only once at the beginning of the simulation.
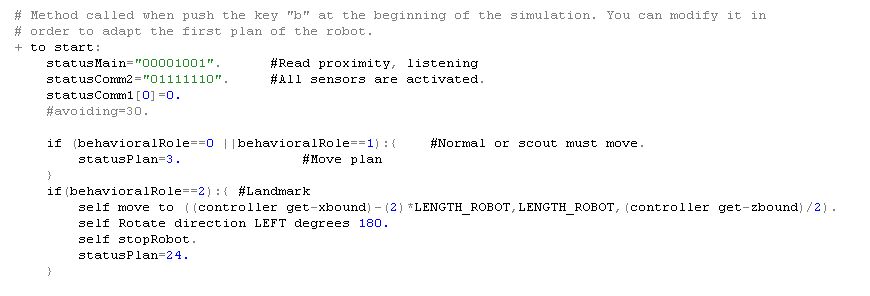
For example, here is the source code of Communication Street Scenario. In this scenario, the robots must create a street. For that, they exchange messages between themselves. There are three different roles in this scenario: normal robots (black robots), a leader robot (white robot) and a scout robot (yellow robot). The leader is the landmark in which, the street must begin. The normal robots are the ones using for building the street. The scout robot does not build the street, it only navigates around the street. This roles are set up with the "behavioralRole" variable.
You can see a snapshot of this scenario above or you can watch a video of this scenario here.
Here is the start method (called only once at the beginning of the simulation) written in the demoAutonomousAgent.tz file:
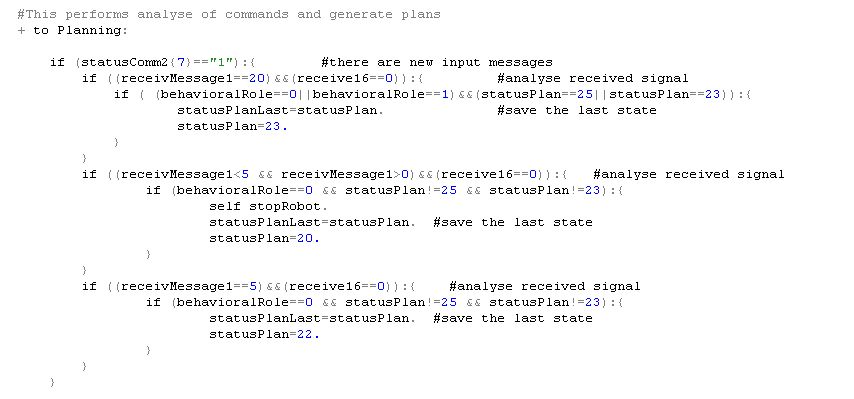
Here is the source code of Planning method:
And finally, here is the source code of ExecutePlan? method:
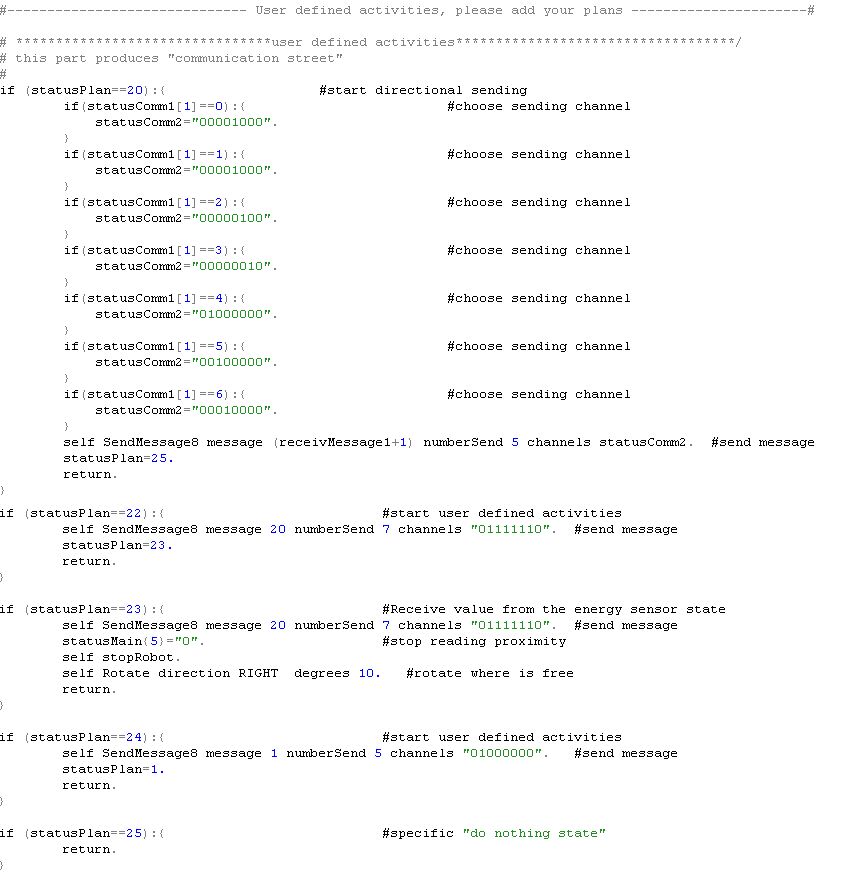
We have added 5 new plans (statusPlan from 20 to 25). This is the easiest way to create new behaviours. Please write your plans without modifying the existing plans.
Each iteration of the simulation, the main loop (see above) is executed, so each iteration, Planning and ExecutePlan? method are called.
Constants using in demoAutonomousConfig.tz file
NAME | USAGE
|
| STAGE_FILENAME | Name of the file for creating the Stage |
| MOVIE_FILENAME | Name of the file for saving the video. The file is saved in the breve directory. |
| RECORD_VIDEO | Value 0: not record video; Value 1: Record video (only valid for Breve 2.4 or later). |
| NUMBER_ROBOTS | Number of robots. |
| REGISTER_BEHAVIORS | Register for behavioural roles (al least write a character even 0). |
| bit 0-1: Number of robots of behavioural role type 0 (normal robot). | |
| bit 2-3: Number of robots of behavioural role type 1 (scout robot). | |
| bit 4-5: Number of robots of behavioural role type 2 (new role). | |
| bit i-i+1: Number of robots of behavioural role type (i/2-1) with role type always >=0. | |
| Types of behavioural Roles: 0 normal robot, 1 scout robot | |
| If it is not specified, a new robot has normal role. | |
| Example: N_TYPES_BEHAVIOR "020308" --> bit 0 and 1: 2 robots with role 0 (normal robot). | |
| bit 2 and 3: 3 robots with role 1 (scout robot). | |
| bit 4 and 5: 8 robots with role 2 (new behaviour). | |
| AVOIDING | Rotation for collision avoiding: small - fine avoiding (always >10), large: - random motion (always < 40). |
| BEAMER_CAN_COMMUNICATE | Value 0: Beamer is not used for communicating; Value 1: Beamer is also used for communicating. |
Available variables for using in demoAutonomousAgent.tz file
NAME | USAGE
|
| myID(int) | The ID of the robot |
| statusMain(string) | Contains the main status of the robot. |
| 0 bit- RC flag: 0 - autonomous mode; 1 - manual mode via remote control | |
| 1 bit- Obstacle flag: 0 - no obstacles; 1 - obstacle on the way | |
| 2 bit- Motion flag: 0 - no current motion; 1 - I'm moving now | |
| 3 bit- Direction flag: 0 - motion forwards; 1 - motion backwards | |
| 4 bit: Critical collision flag: 0 - there is still open; 1 - no more motion | |
| 5 bit: read proximity: 0 - don't read; 1 - read | |
| 6 bit: TWI synchronization flag: 0 - slave' last activity not finished; 1 - finished | |
| 7 bit: receiving bit: 0 - don't receive(don't listen) anything; 1 - listen for incoming messages | |
| statusComm1(2 ints) | Contains status of send communication. |
| statusComm1(0) represents how many times an output message has to be sent; 64 times max. | |
| statusComm1(1) channel that receives the message | |
| statusComm2(string) | Contains status of receiving communication. |
| bits 0-6: channels that should send the message. | |
| bit 7: value 0 - no new input messages; Value 1 - there is a new input message. | |
| behavioralRole(int) | Value 0: normal, Value 1: scout, Value 2: leader (you can add more). |
| localSensors(7 doubles) | Array with sensors data for motion. |
| localSensorsComm(7 doubles) | Array with sensors data for communications. |
| receivMessage1(string) | Contains the 1 word of message obtained via communication. |
| receivMessage2(string) | Contains the 2 word of message obtained via communication. |
| sendMessage1(string) | Contains the 1 word of message to be sent. |
| sendMessage2(string) | Contains the 2 word of message to be sent. |
| send16(int) | Defines the number of bits of the messages to be sent. |
| Value 0: 8 bits; Value 1: 12 bits; Value 2: 16 bits. | |
| receive16(int) | Defines the number of bits of the messages to be received. |
| Value 0: 8 bits; Value 1: 12 bits; Value 2: 16 bits. | |
| statusPlan(int) | Variable for executePlan method. |
| statusPlanLast(int) | Variable for storing the lastPlan executed. |
| avoiding(int) | This contains the rotation angle (in degrees) for collision avoiding: small - fine avoiding; large – random motion. |
Available methods for using in demoAutonomousAgent.tz
NAME | FUNCTIONALITY
|
| Read_sensor channel IrSensorId(int) | Reads the value of the sensor IrSensorId?. It returns the value read from the ADC. |
| stopRobot | Stops the robot and update the registers. |
| moveRobot distance d (int) | Moves the robot an integer distance (if distance==0, it moves continuously). |
| Rotate direction d(int) degrees grades (int) | Rotates the robot an angle. |
| ReadProximity | Detects is any obstacle is in the way and how far it is. |
| Read_distance channel IrSensorId(int) | Reads the value of the sensor. It returns the value read from the ADC. Return value > 90 |
| sendRequest channel IRChannelID(int) | Sends a request to a neighbor ONLY if I can see it. |
| sendACK channel IRChannelID(int) | Sends an ACK to a neighbor ONLY if I can see it. |
| sendLittleACK channel IRChannelID(int) | Sends a little ACK to a neighbor ONLY if I can see it. |
| send_8bits message msg(string) channel IRChannelID(int) | Sends a message with 8 bits in a specified channel. |
| send_16bits message1 msg1(string) message2 msg2(string) channel IRChannelID(int) | Sends a message with 12 bits in a specified channel. |
| ReceiveMessages | Detects if someone has sent any message to me. |
| SendMessages | Sends messages with the datas saved in sendMessage variables. |
| resetComm | Resets Communications (disable communications). |
| SendMessage8? message message(string) numberSend numberSend(int) channels channels(string) | Prepares the sendMessage variables for sending messages. |
| start | This method is called when you press the key “b” at the beginning of the simulation. In it, you can set up the initial variables for the robot. Also, you can define different values for the variables depending on the behavior of the robot. This method is set in the demo/demoAutonomousAgent.tz file. |
Inside the simulation package, there is a documentation file with all instructions for creating a new Simulation or for running a saved simulation.